
Drupal CMS 1.0 was released on January 15th 2025 as scheduled, just eight months after the idea was first announced! The release is a milestone achievement by the Drupal community as it is the beginning of a journey that many believe will open up Drupal to many users that ordinarily will not be able to use Drupal.
Drupal CMS is not a different software from the Drupal that has been available all along. It is still the same Drupal. What is different and why everyone is excited is because Drupal CMS comes with prepackaged functionality, reducing drastically the time to set things up if one had started with Drupal core and installed modules. Drupal CMS is Drupal core bundled with prepackaged functionality produced by a combination of modules and configuration. So when you install it, you can find a recipe, apply it, and it adds the required modules and bundles their configuration along. So you will get a complete feature out of the box! Normally, if you install the same modules on Drupal core, it might take a few days to produce the same configuration.
With Drupal CMS, you can install modules, themes and recipes on the interface. You won't need Composer anymore. When you install a module on the UI, the site will automatically update your composer.json so it is still Composer but this time you don't have to worry about it. If you are a developer, then the site helps you to update composer.json so you can update it and the site takes over from you, and you take over from the site again. I did say you won't need Composer anymore, but that will be at least after you have launched the site, because from what I can see so far, you will still need Composer to install the site in the first place.
With Drupal CMS, there is automatic updates, so you can update Drupal core and modules on the interface. This is an absolute game changer for Drupal as it was only possible with Drupal 7 to update modules on the interface but not core. This will drastically reduce the cost of owning Drupal sites as owners can now keep their sites updated by themselves without relying on their developers to do that for them.
You can see why we in the Drupal community are so excited about this.
What was released is version 1.0 We are all hoping for improvements as further releases are made. One notable feature being eagerly awaited is Experience Builder. It will be added in a later version, and it will be a major improvement to the present Layout Builder in the current version.
IT WILL BE GOOD TO MENTION
It will be good to mention that adding prepackaged complete functionality is a feature driven by recipes which Drupal CMS ships with and offers lots of them and will offer even more as it matures. Recipes are what bundles modules and configuration in one package, you apply it to your website, and you get a complete solution out of the box. For example, you will add a blog recipe, and you get a complete blog feature on your site ready for you to just start writing. You add an SEO recipe and all the modules you need for SEO are installed and configured for you.
Now, recipes are not exclusive to Drupal CMS. You can apply recipes to any Drupal site whether started with Drupal core or Drupal CMS. Likewise, other features like automatic updates, project browser, experience builder, etc., can all be used on Drupal core also.
Many, if not all, of the initiatives that congregated into Starshot were on course before the idea of Starshot was announced: recipes, automatic updates, project browser, had all been on course.
Now about installation.
How to install Drupal CMS
On the download page for Drupal CMS, as at the time of writing, is this message,
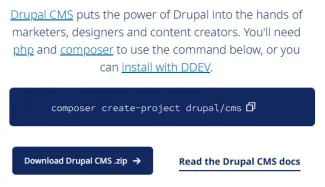
Let us look at each one of the options:
Composer command
First will be the Composer command,
composer create-project drupal/cmsIf you run this command, Composer will download Drupal CMS for you. It will not just download the Drupal CMS installer, it will download the full project at once. You will then use your favorite development tool to launch it and start setting up the site.
Install with DDEV
CMS 1.1.0 was released on 19 March, 2025 and one of the changes it introduced was the
launch-drupal-cms.shscript was removed. It was replaced by the following DDEV commands:mkdir my-drupal-site && cd my-drupal-site ddev config --project-type=drupal11 --docroot=web ddev start ddev composer create drupal/cmsThese commands make it very easy to install Drupal CMS if you are using DDEV for local development.
The link here will take you to the page where you will see steps and instructions to install Drupal CMS with DDEV. DDEV is a local development tool like Lando, WAMP, XAMPP, and the like.
Following the guide, there's a Bash script
./launch-drupal-cms.shdesigned to automate the entire installation process. This script is specifically tailored for Unix-like environments (Linux, macOS, or the Windows Subsystem for Linux (WSL)).For Windows users like me, running this script directly might not work flawlessly without the right setup. From my experience and understanding so far, to run this script successfully on a Windows machine, you need to:
a. Enable the Windows Subsystem for Linux (WSL) and Virtual Machine Platform features.
b. Install a Linux distribution (such as Ubuntu) via the Microsoft Store.
c. Launch the WSL terminal and execute the script from there.
This setup provides the required Unix-like environment for the script to function properly. If you’re using Windows without a Linux distribution installed and have managed to get this script running, feel free to share your experience in the comments!
Notwithstanding, I still installed Drupal CMS with DDEV on my Windows PC.
HOW I INSTALLED DRUPAL CMS WITH DDEV ON MY WINDOWS COMPUTER WITHOUT A LINUX DISTRIBUTION INSTALLED
I have been using DDEV to build sites, so what I did was I downloaded Drupal CMS with Composer. I navigated to the folder and ran
ddev configas I would normally configure any other Drupal website on DDEV. I completed the configuration and randdev start. The process proceeded as it would for any other Drupal project, then I randdev launchand the site was launched successfully.Note that as I decided to use DDEV for development, I could as well have used Lando or WAMP or XAMPP or any other development tool of my choice to set up the site, after I downloaded Drupal CMS with Composer.
Download Drupal CMS .zip
This will download the Drupal CMS Installer. You will need to download the full project with Composer, and then you can handle development with any local development tool of your choice.
DEPLOYING TO SHARED HOST PLANS ESPECIALLY DEPLOYING INSIDE PUBLIC_HTML OF CPANEL
Since Composer was introduced in Drupal 8, it will install Drupal inside a web web-root by default. This has come to mean that the Drupal community assumes that your web-root will be named web.
This is not the case when you purchase a shared host plan with most of the hosting providers using cPanel and cPanel will have public_html as the default web-root.
So how will you install Drupal CMS into public_html?
With the release of Drupal CMS 1.2.0 on 20th June 2025, a new package, drupal/cms_cpanel was created, which installs Drupal into the project root for compatibility with Softaculous and other cPanel-like web hosting environments. I wouldn't recommend this package if you are starting your project locally, and you want to stick with having the recommended relocated document root. In which case, I would recommend you use the guide I wrote below or any other way you would please, to achieve a relocated docroot. But if you just can't get the setup below to work for you or feel it is cumbersome, you can then use this template to start your project with the following command: composer create-project drupal/cms_cpanel project-directory. The project-directory part is anything you wish to call your project directory. If you use this locally, then uploading to your cPanel server will simply be to deploy the entire contents of your project root inside public_html.
I will demonstrate this using the method I used for my installation above, which is downloading Drupal CMS with Composer and then developing with DDEV. Let's get through it:
Download the Drupal CMS Installer with Composer by the running the command (before you run the command, change 'project-directory' to the actual name you want to call your project directory),
composer create-project --no-install drupal/cms project-directoryNotice that this is slightly different from the command on the Drupal download page, which is
composer create-project drupal/cms. Note that I have introduced a--no-installflag which will stop the installation of the full Drupal CMS project upon project initiation. I also introduced a target directory 'project-directory'. The target directory instructs Composer to name the project folder, 'project-directory'. If I ran the command without the target directory, Composer will name the project folder the same name as the package, being 'cms'. Why it is necessary to add the target directory is that after you created your first Drupal CMS project, if you run the commandcomposer create-project --no-install drupal/cmsagain, you will get this error,Project directory "/home/ferdinand/sites/cms" is not empty.This is because your first project was named 'cms' by default, and your second project is again attempting to be named 'cms'. Composer will refuse the installation with the error message because it cannot create two project directories with the same name in the same place. Apart from this, specifying the target directory allows you to give your project directory a desirable name.This is called a modified install.
Note that you can make a modified install with any of the installation options on the Drupal download page. When you download the .zip file, you will modify the web-root before proceeding with your choice of development.
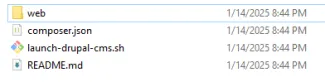
Here is the folder structure of what Composer downloaded when it initiated the project,
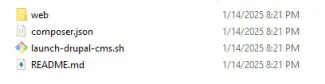
Now rename
webtopublic_htmlas shown below,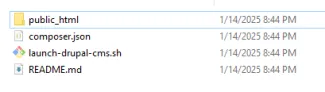
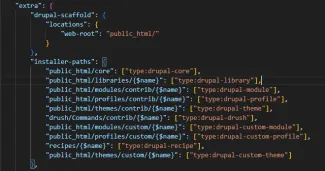
Open the project in an editor like VS Code and edit composer.json.
Replace all occurrences of
web/topublic_html/as shown below: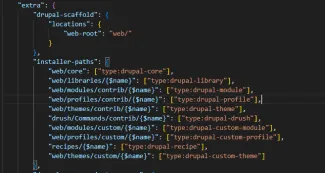
Before
After
Drupal CMS 2.0 was released on January 28, 2026, offering visual drag and drop site building, ready-made site templates, and lots of AI tools.
CMS 2.0 introduced Drupal Canvas as the default editing experience, offering drag and drop site building with live previews and real-time editing.
As regards this 3rd step of this modified installation process, you have more
web/mentions to edit in CMS 2. In addition to composer.json, also open in your editor the files AGENTS.md and .gitignore and edit all occurrences ofweb/topublic_html/. Also open the file assets/.ddev/config.yaml and editdocroot: webtodocroot: public_html.Go back to the terminal and from the project root run the command
composer installComposer will now download the full Drupal CMS project, but this time they will be downloaded inside
public_htmlfolder instead of the defaultwebfolder.NOTE:
If you don't have Composer installed globally on your laptop then the 'composer' command will not be available for you to run like that. In this case you will have to run the following commands to configure the DDEV project so you can use Composer within the project's DDEV container.
ddev config --project-type=drupal11 --docroot=public_html
ddev start
Then
ddev composer installDDEV now uses the copy of Composer in its container to download Drupal CMS, saving you task of having Composer globally on your laptop.
NOTE: There is an issue with this method and that is, running
ddev configbeforeddev composer installbreaks the config that Drupal CMS ships in assets/.ddev/config.yaml which ought to execute recipe unpacking. To fix this now run:ddev composer drupal:recipe-unpackTo avoid this issue of recipe unpacking use
composer installas initially suggested in step 4 as againstddev composer installand then move to step 5. This means you should have composer installed on your local machine globally.In this case you can launch the installer right away as step 5 below is already taken care of. Launch the installer with the command.
ddev launchInstall the site with DDEV (remember you can choose to install with Lando, WAMP, XAMPP or any other development tool of your choice)
NOTE: If you used the
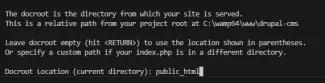
ddev composer installoption in step 4 above, then you are done, and you don't have any more business here in step 5.Making sure DDEV is ready on your system, go on a terminal and navigate to root of the project and run the command,
ddev configEnter your project name.

Enter your docroot
DDEV will detect you have a Drupal 11 project inside your docroot and will suggest that Project type, so just press Enter,

Configuration is complete,

Next step is to run the command,
ddev startDDEV will set up the environment for your site and, when done, you will use this command to launch your site on your browser,
ddev launchYou can now configure your site and start building.
HOW WILL THIS WORK USING THE BASH SCRIPT?
As I said earlier, with the release of CMS 1.1.0, the launch-drupal-cms.sh script was removed. The DDEV commands that replaced it would be ideal if you did not care to rename the docroot from web. In the case you want to rename it to public_html, you might still get it to work but DDEV will still create a web folder in parallel to your public_html folder. You will then have to delete the duplicate web folder. I do not like that, so I stick with the method in the preceding section.
It will be a similar process.
Download the .zip file and extract it. You will have the same folder structure as below,
Rename 'web' to 'public_html' as shown below,

- Open the project in an editor like VS Code. Open composer.json and replace all occurrences of 'web' to 'public_html' as described above.
Open the file 'launch-drupal-cms.sh' and edit the web-root to public_html as shown below,

Before

After
Now run the command,
./launch-drupal-cms.shDrupal CMS will be installed inside the folder public_html.
MY EXPERIENCE ABOUT INSTALLING DDEV ON A WINDOWS COMPUTER
I have since installed WSL2 with Ubuntu and set up Docker inside WSL2, following the official DDEV documentation. This gives me a better, faster and more native development experience on Windows, without needing Docker Desktop.
I use a Windows PC and I have been using DDEV for development before the launch of Drupal CMS. I don't have Ubuntu installed on my PC yet.
You can use DDEV on a Window computer without going the full hog to install a Linux distro. In this case, you will use Docker Desktop. Here is how I set this up personally (I am no authority on DDEV documentation so for a guide on how to install DDEV, please check the official DDEV documentation):
Enable WSL (Windows Subsystem for Linux) and Virtual Machine Platform Features
Launch Windows PowerShell as Administrator and run the following commands,
dism.exe /online /enable-feature /featurename:Microsoft-Windows-Subsystem-Linux /all /norestart
dism.exe /online /enable-feature /featurename:VirtualMachinePlatform /all /norestart
Alternatively, if you are more comfortable using the GUI then do it this way,
Open Windows Features:
- Press Windows Key + R to open the Run dialog box.
- Type
optionalfeaturesand press Enter.- This will open the Windows Features dialog box.
Locate and Enable the Features:
- Scroll down and find:
- Windows Subsystem for Linux
- Virtual Machine Platform
- Check both boxes.
Restart Your Computer
Install Docker Desktop using Chocolatey
If you do not have Chocolatey installed, go over here to see how to install it.
Run this command in PowerShell (as an administrator),
choco install docker-desktopOnce installed, restart your computer if prompted.
Install DDEV using Chocolatey
Run the command,
choco install ddev
Once both Docker and DDEV are installed, you are good to go!
To use DDEV, you will first launch the Docker Desktop application. Once Docker Engine is started, you can use DDEV.
I would like to say that for a better experience on a Windows machine, you should follow the DDEV documentation to install Docker and DDEV inside WSL2. This will give you: better performance - no overhead from Docker Desktop running on Windows; more Linux-native experience - everything runs in a pure Unix-like environment; and less interference from Windows - no issues with Windows file system performance.
It might also help to mention that when you install WSL2 and you now have a full-blown Linux environment, and you now develop sites inside WSL directly; you will have to be installing Linux version of applications in WSL. Your computer will essentially become a dual-environment machine having a Windows side (Host OS) and a WSL side (Linux Subsystem Inside Windows). The Windows side will run Windows applications while the WSL side will run Linux applications.